How to Adjust Headlights to Achieve a Perfect Aim
There are different reasons why you may need to adjust your headlights. The first is if you recently got involved in a car accident that left your lights misaligned. Misalignment may also occur when changing a bulb or due to careless driving on rough roads.
All in all, if your headlights are pointing too low, you will not be able to see more than 20 feet. If you can only see the top of trees and the sky when driving at night, it means they are pointing too high. Other ways you may realize that your headlights are misaligned is if they point far inwards or outwards.
In this guide, we’ll provide a step-by-step process on how to adjust headlights manually. It’s important to note that not all cars provide this feature. Before getting down to work, consult your user manual to confirm whether your headlights are adjustable.
How to Adjust Headlights
What you’ll need:
- Masking tape
- Tape measure
- Dark cloth
- Screwdriver
Step 1: Check your user manual
The first step is to check whether your car has a provision for adjusting headlights. You can peruse through your user manual or search online.
Confirm the type of adjustment screws included and where they are located. This will guide you on which screwdriver to use – whether flathead or cross-head.
Also, you’ll need to confirm whether your headlights have horizontal or/and vertical leveling bubbles. These tell you when your headlight adjustment is off.
Not all models have them. If your car is missing these, this guide will show you how to make the adjustments manually.
Step 2: Park the car on a flat surface
Start by parking the car on level ground in front of a wall. You can also park in front of a garage door. Drive the vehicle about 6 feet away from the wall and ensure it’s completely level.
Unload all the cargo, confirm that tire pressure is correct, and fill up your gas tank until it’s full. Ensure that the suspension system is working correctly and that the car isn’t leaning on either side.
Step 3: Turn your low beams on and make marks
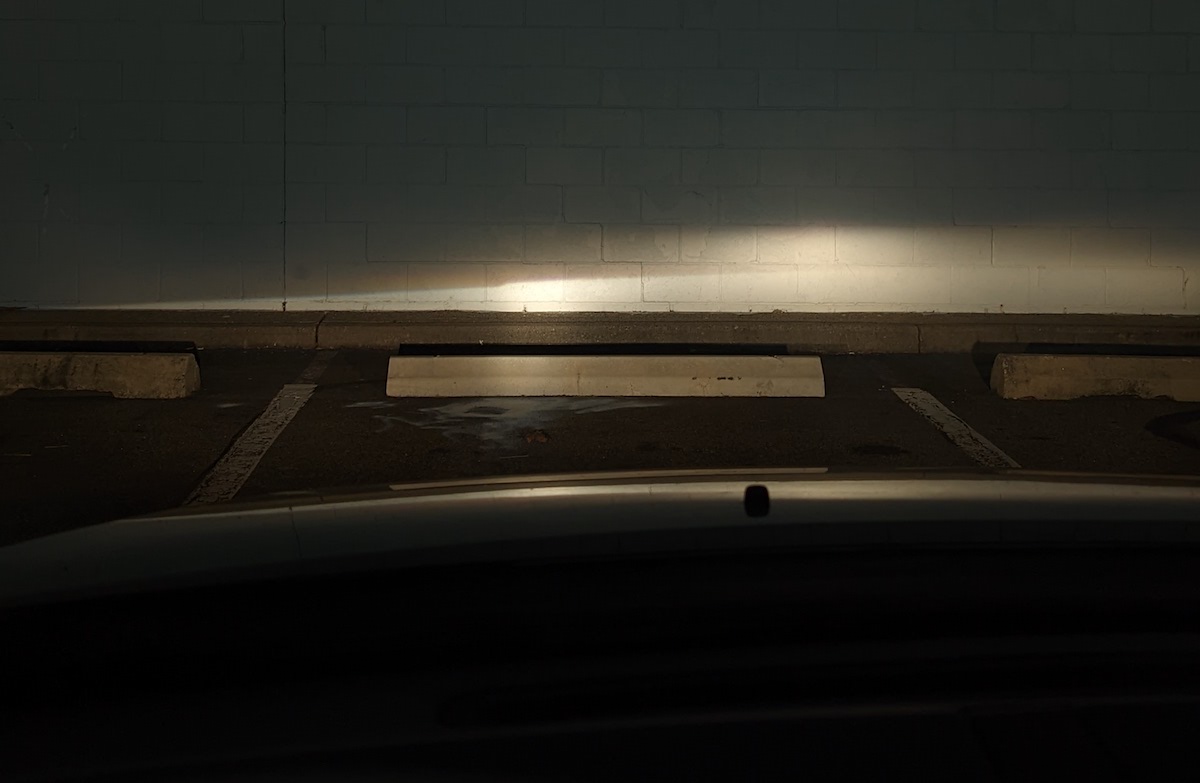
Get inside your car and turn on your low beam headlights. Get out of the car and move close to the wall. Use masking tape to mark where the headlight shines on the wall. You want to mark at the center of the beam. Make horizontal and vertical lines to form a cross.
Step 4: Measure the distance between the headlights
Pick your tape measure and measure the distance between each headlight and the ground. Note the difference between the two. You may realize that one headlight illuminates higher or lower than the other.
Make a mark on the wall where the misaligned headlight’s center line should be. Some vehicles include markings within the headlight cover that help to locate the center axis of the light beam. Consult your user manual for this.
Step 5: Back away from the wall
Get back into the car and reverse to about 25 feet from the wall. The recommended distance varies from vehicle to vehicle. Toyota recommends adjusting your headlights at 10 feet while Chrysler recommends 33 feet.
Use the tape measure to ensure the distance between the front wheels and the wall is roughly 25 feet (or the recommended distance). Get out of the car and place a dark microfiber cloth on one of the headlights.
Get back inside and turn on your headlights. Take note of where the brightest part of the light beam illuminates on the wall or garage door. Compare this to the markings you made on the wall. If your headlights are off by a few feet, it’s time to adjust them.
Step 6: How to adjust your headlights
Locate the adjusting screws on your headlights. Confirm which one is the vertical screw and which one is the horizontal screw. In some cars, you may need to remove the bezel or ring that goes around the headlight to locate the screws.
With a dark cloth covering one headlight, start by adjusting the vertical field of the other headlight. Turn the screws slowly in a clockwise direction to raise the headlight’s illumination or counterclockwise to lower it.
Do the same for the horizontal field. Turn the screw clockwise to shift the light’s illumination inwards or counterclockwise to shift it outwards. Make a quarter of a turn each time to gauge the level of adjustment made.
As a rule of thumb, the topmost part of the brightest part of the beam should illuminate below or at the centerline of the horizontal axis. This prevents you from blinding oncoming traffic.
On the other hand, the brightest part of the beam should fall on the right of the vertical axis. This ensures that you can see people, animals, and obstacles as you drive on the road. Make the same adjustments on the second headlight.
Step 7: Tweak the headlights to perfection
Keep adjusting the headlights until you achieve the desired results. The light beam should line up with the markings you made on the wall. Most cars do not have separate adjustment screws for the high beams.
The good news is that adjusting your low beam headlights also adjusts the high beams. Once done, take your car for a road test at dawn or dusk. Turn both your high beams and low beams on and check to see that they are adjusted correctly. Make further adjustments to fine-tune your visibility.
Conclusion
Car manufacturers will typically provide instructions on where headlights should be aiming. They provide a minimum and maximum distance between the horizontal centerline of the headlight and the center of the beam. This acts as a guideline when adjusting your headlights.
Also, be sure to check if there are any headlight aiming specifications provided by the law. Following the instructions ensures that you do not dazzle other drivers and that your safety is not compromised when driving at night. You’ll have a better chance of safely maneuvering dark roads.
Recent Blog Posts
November 29, 2022
One of the best solutions for fixing hazy headlights is to wet sand them. While there are other ways you can clear up your oxidized headlights, few methods work as great as wet sanding. It not only cleans the plastic lens completely but also achieves permanent results.
November 29, 2022
Headlights that have turned yellow can make a car look really old. The foggy coating that covers the headlight tends to reduce the amount of light emitted on the road. This can affect the driver’s visibility and make it hard to maneuver dark roads.
November 29, 2022
There are plenty of solutions out there when it comes to cleaning the outside of your headlights. You can easily remove the yellow coating that forms on the plastic lens using a few household products.